Replacing a bathtub is a big project that involves more than just swapping out the old tub for a new one. It’s important to understand the process, the steps involved, and why it requires careful planning and skilled workmanship. A bathtub isn’t like a piece of furniture that can simply be carried out and replaced. In most homes, the original tub was installed right after the framing stage of construction. This means the walls, Sheetrock, tile, trim, and baseboards were all built around the tub — not the other way around.
If you are planning to replace your bathtub, here’s what you can expect at each stage of the process.
1. Initial Planning and Selection
The first step is choosing the new bathtub. There are many different styles, including:
Standard alcove tubs – The most common type found in many homes. Soaking tubs – Deeper tubs designed for comfort. Freestanding tubs – A popular choice for master bathrooms. Whirlpool or jetted tubs – For spa-like experiences.
During this planning stage, you’ll also need to think about:
Size and dimensions: The new tub must fit within the same footprint or a slightly adjusted area. Weight: Some soaking or cast iron tubs are very heavy and may require extra floor support. Plumbing connections: The drain and water lines need to match the new tub or be relocated. Surrounding finishes: Tile, drywall, and flooring will be affected during the installation.
Having a clear plan before demo day ensures fewer surprises later.
2. Preparing the Area
Before work begins, the area must be prepped. Your plumber or contractor will:
Turn off the water supply to the bathroom. Lay down protective coverings to protect your floors and hallways. Remove any accessories, shower curtains, or glass doors. If needed, set up dust barriers to contain debris from spreading throughout the home.
This prep work keeps your home clean and limits the mess during the project.
3. Demo: Removing the Old Tub, Tile, and Sheetrock
Here’s where many homeowners are surprised. Since the bathtub was installed first during the original construction, the walls and tile need to be cut open to remove it. There’s no way to simply slide it out without some demolition.
What to expect:
Tile removal: The tile surrounding the tub must be removed to access the flanges and edges of the bathtub. Sheetrock cutting: Sections of drywall will be cut away around the tub to create enough clearance. Baseboards and trim removal: These will need to be carefully removed and possibly replaced after installation.
This part can be dusty and noisy. Most professionals will use vacuums and dust collection tools, but some mess is unavoidable.
4. Disconnecting Plumbing and Drain
Once the walls are open, the plumber will disconnect:
The drain assembly beneath the tub. The overflow drain (typically near the top of the tub). The water supply lines to the faucet and shower valve if necessary.
This step requires precision to avoid damaging pipes that are hidden in the walls or under the floor.
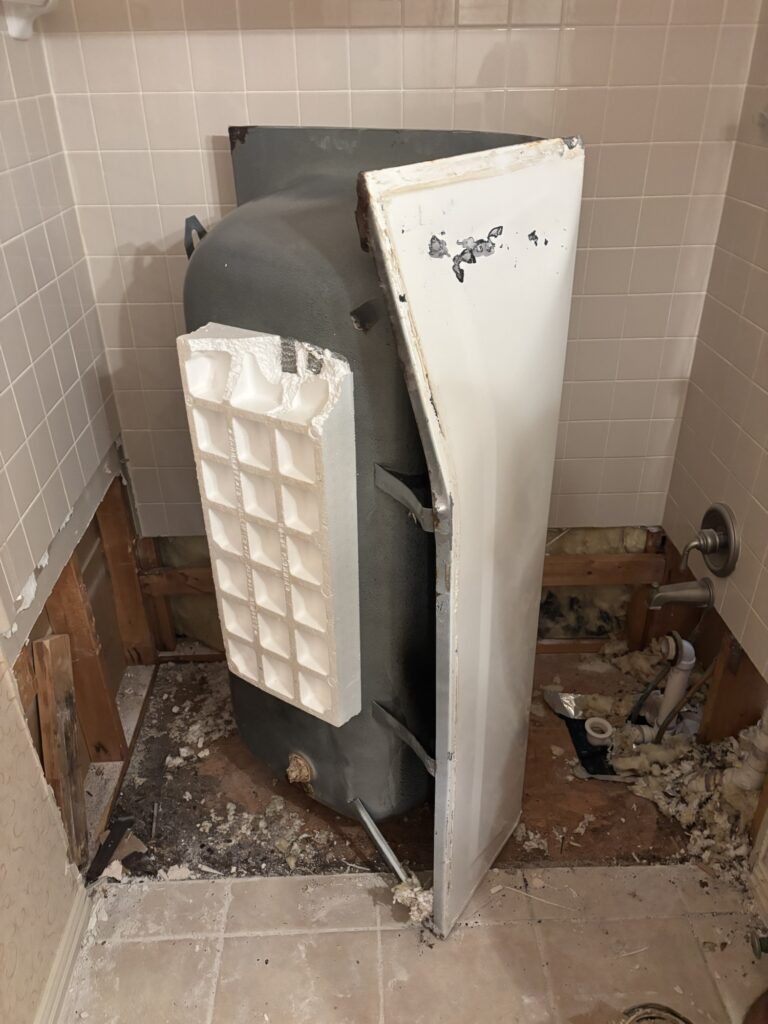
5. Removing the Old Tub
After the surrounding materials and plumbing are disconnected, the tub can finally be removed. Because it was installed during the framing phase, there are two common methods:
Sliding it out in one piece if there’s enough space. Cutting the tub into sections (often with a saw or grinder) to remove it safely in smaller pieces.
If the tub is cast iron, it may need to be broken apart using special tools due to its weight.
6. Inspecting the Subfloor and Plumbing
Once the old tub is out, this is a perfect time to check:
The condition of the subfloor for any water damage or rot. The plumbing system for leaks, corrosion, or outdated materials. The levelness of the framing, which is critical for proper installation.
Catching these issues now prevents future problems and adds years of life to your new bathtub.
7. Installing the New Tub
The new tub is carefully moved into position and set securely. This requires:
Shimming and leveling so the tub sits perfectly flat. Securing the flange to the wall framing for stability. Connecting the drain and overflow assembly using watertight seals. Reconnecting water lines if any adjustments were made.
The goal is to ensure the tub is solid, doesn’t move, and has no leaks.
8. Rebuilding the Surrounding Area
After the tub is installed, the walls must be rebuilt:
New Sheetrock installation: Any areas cut out during demo are patched with fresh drywall. Waterproofing: Before tile is reinstalled, a waterproof membrane or backer board is applied to prevent future leaks. Tile replacement: The new or existing tile is set around the tub for a clean, finished look. Baseboards and trim: These are reinstalled or replaced to match the bathroom’s original style.
9. Final Touches and Cleanup
The last steps include:
Grouting and sealing the new tile. Caulking around the tub edges. Reinstalling fixtures such as the showerhead, faucet, and handles. Thorough cleaning to remove all dust and debris.
The plumber will also do a final water test to ensure everything functions perfectly.
10. Expected Timeframe and Costs
The time to complete a bathtub replacement depends on complexity:
Simple swap with minor demo: 2–3 days. Full remodel with tile work and plumbing changes: 4–7 days.
Costs can vary widely based on:
Type of tub selected. Tile removal and replacement area. Plumbing changes required. Materials and finishes chosen.
On average, homeowners should budget $3,000–$7,000 for a professional bathtub replacement, though luxury upgrades can exceed that.
Why Professional Installation Matters
Because the bathtub was originally built into the home during framing, this project involves more than just plumbing skills. It requires:
Knowledge of structural framing and support. Proper waterproofing to prevent future leaks. Accurate plumbing connections for long-term reliability. Professional tile and Sheetrock work for a seamless finish.
Hiring a licensed professional ensures your project is done safely, up to code, and with a warranty you can trust.
Final Thoughts
Replacing a bathtub is a major home improvement project. It’s more complex than many homeowners expect because the tub was originally installed before the walls, tile, and finishes. Understanding the steps involved — from demolition and Sheetrock cutting to final tile work — helps you plan realistically for time, cost, and disruption.
A quality bathtub replacement not only improves the look of your bathroom but also protects your home from leaks and water damage for years to come. By working with experienced, licensed contractors, you can enjoy a safe, functional, and beautiful new bathtub with confidence.